

ToshiXZ
New member
- Joined
- Jul 27, 2007
- Messages
- 137
- Points
- 0
Briefing:
Animated PNG, abbreviated as APNG(pronounced "A-ping") is an unofficial extension of the popular PNG image file format. On the basis that the current GIF file format did not support 24 bits for colours, which is necessary for a wider variety of colours, nor 8 bits for transparency. In 2007, APNG was officially implemented into Firefox 3.5 and Opera 9.5. APNG is also backwards compatible with PNG, so any browser that can display PNG files will be able to view the first frame.
Due to rejection by the creators of PNG, it has failed to gain mass popularity and become standardized in modern browsers. Many browsers, including but not limited to, Internet Explorer, Safari, and Google Chrome, do not support APNG. Nonetheless, they are still supported by Firefox and Opera, and are fun to play around with.
/Briefing
That's cool and all, but because APNG isn't official (yet), the option to create APNGs hasn't appeared in many image editing programs. We can still create APNGs, and so I begin my tutorial on how to turn a simple youtube video into an animated png!
Pre-steps:
First of all you're going to need a couple programs. GIF Movie Gear is required to edit all the frames at once, and save them as an animated PNG. DVDVideoSoft's Free Youtube Downloader is my choice of youtube downloaders, offering the highest quality, many options, and being free. Since we are also going to need to extract the frames from the video, we are going to need a Video to JPG converter. DVDVideo soft also offers a free tool for this, so I have chosen that. Download and setup all files, and prepare to follow the steps below.
Step 1:
This is the step that may take most of your work, but it's not that hard. Simply find a YouTube video you like, and find the timeframe you want. It should be between 2 and 5 seconds. Big time frames results in massive file size, and it can be difficult to get them hosted. You are going to have to find this timeframe by searching through a lot of still images and parts of the video, so be sure to remember some key points before and after it!
Step 2:
Use a bit of logic here and you should be able to figure this step out yourself. Now we're going to need to download our movie
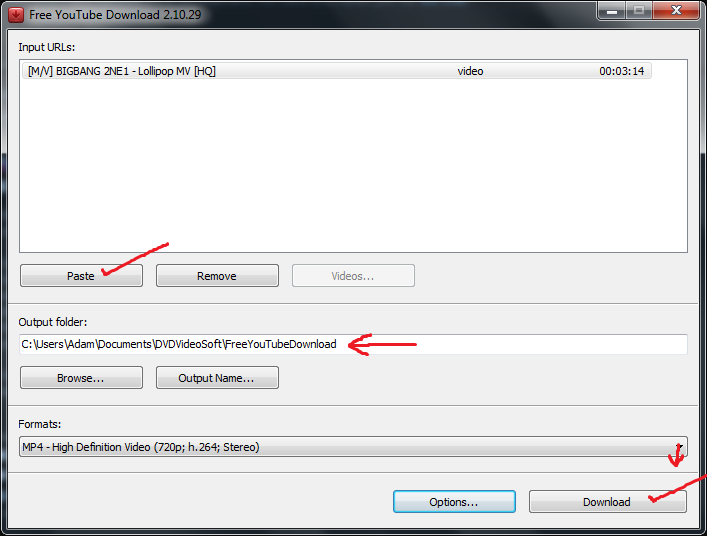
Instructions: Paste your video link in, note down or change your output folder, select your quality (I recommend 720p), and download!
Step 3:
Now that we have our downloaded Youtube video, we're going to want to extract all the frames(pictures) out of it. Boot up Video to JPG Converter!
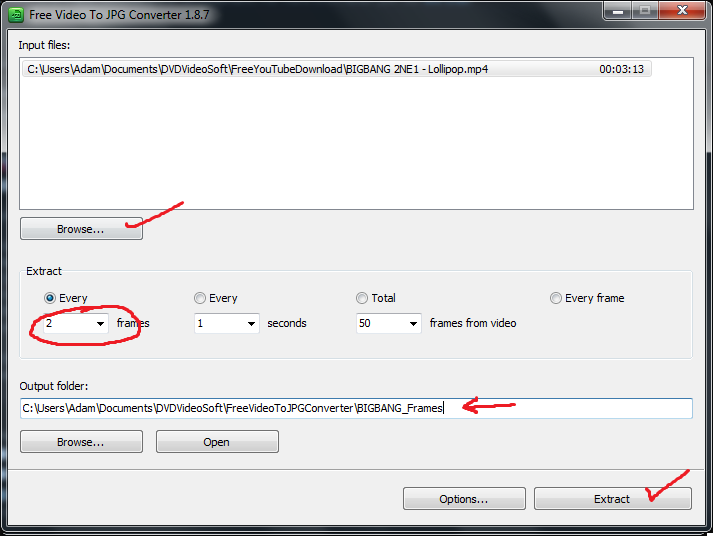
Instructions: Browse for your video file that was downloaded to your "Output" folder from the video downloader, make sure you check "Every 2 frames", and make sure you put in an "Output" folder here that is empty as it will soon hold a few hundred or thousand pictures. Extract, and so we go on!
Step 4:
Part A) Now to some manual work. Remember where in the movie your timeframe appears. A good way to estimate is find out how many frames are in the movie total, and how many seconds are in the video. Divide the seconds by the total amount of images, and you'll get a basic frames per second sort of thing. If your timeframe is at 86-90 seconds, multiply 86 by the frames per second and you will get a good guess at where about your timeframe will start.
Part B) Copy all your images that you want into a new, clean folder.
Setting up GIF Movie Gear: Click on Edit -> Preferences -> Use tab -> Select "Other. Custom settings for palette and color settings." -> Click on Palettes tab, select "Map new to current global palette (no change)". -> Click Animation tab -> Set delay as "4". -> Click Export II tab -> Make sure everything on this page is ticked apart from the Filmstrips.
Step 5:
Boot up GIF Movie Gear.
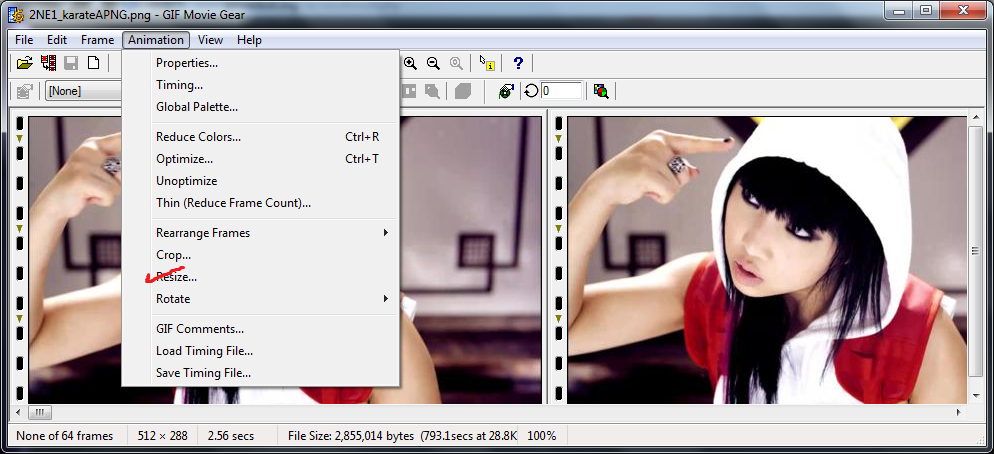
Instructions: Click on Resize. Make sure you maintain aspect ratio. A good rule of thumb for youtube videos is that it can still look good at 40% of the size of a 720p. This also really cuts down on the file size")
Step 6:
We're basically done now. You may want to click the start button, and see how it looks. If it is too slow or too fast, click the Clock with a downwards arrow on it, and edit the global frame delay. Once you've found your perfect frame delay, click on File -> Save As -> save it as type PNG, and input your file name. Since files with animation can be very large, I suggest you use Photobucket since it has greater file uploading limits than most sites. It also helps you keep track of all the pictures you've uploaded.
Step 7:
Copy the link and share!!!
<3

Animated PNG, abbreviated as APNG(pronounced "A-ping") is an unofficial extension of the popular PNG image file format. On the basis that the current GIF file format did not support 24 bits for colours, which is necessary for a wider variety of colours, nor 8 bits for transparency. In 2007, APNG was officially implemented into Firefox 3.5 and Opera 9.5. APNG is also backwards compatible with PNG, so any browser that can display PNG files will be able to view the first frame.
Due to rejection by the creators of PNG, it has failed to gain mass popularity and become standardized in modern browsers. Many browsers, including but not limited to, Internet Explorer, Safari, and Google Chrome, do not support APNG. Nonetheless, they are still supported by Firefox and Opera, and are fun to play around with.
/Briefing
That's cool and all, but because APNG isn't official (yet), the option to create APNGs hasn't appeared in many image editing programs. We can still create APNGs, and so I begin my tutorial on how to turn a simple youtube video into an animated png!
Pre-steps:
First of all you're going to need a couple programs. GIF Movie Gear is required to edit all the frames at once, and save them as an animated PNG. DVDVideoSoft's Free Youtube Downloader is my choice of youtube downloaders, offering the highest quality, many options, and being free. Since we are also going to need to extract the frames from the video, we are going to need a Video to JPG converter. DVDVideo soft also offers a free tool for this, so I have chosen that. Download and setup all files, and prepare to follow the steps below.
Step 1:
This is the step that may take most of your work, but it's not that hard. Simply find a YouTube video you like, and find the timeframe you want. It should be between 2 and 5 seconds. Big time frames results in massive file size, and it can be difficult to get them hosted. You are going to have to find this timeframe by searching through a lot of still images and parts of the video, so be sure to remember some key points before and after it!
Step 2:
Use a bit of logic here and you should be able to figure this step out yourself. Now we're going to need to download our movie
Instructions: Paste your video link in, note down or change your output folder, select your quality (I recommend 720p), and download!
Step 3:
Now that we have our downloaded Youtube video, we're going to want to extract all the frames(pictures) out of it. Boot up Video to JPG Converter!
Instructions: Browse for your video file that was downloaded to your "Output" folder from the video downloader, make sure you check "Every 2 frames", and make sure you put in an "Output" folder here that is empty as it will soon hold a few hundred or thousand pictures. Extract, and so we go on!
Step 4:
Part A) Now to some manual work. Remember where in the movie your timeframe appears. A good way to estimate is find out how many frames are in the movie total, and how many seconds are in the video. Divide the seconds by the total amount of images, and you'll get a basic frames per second sort of thing. If your timeframe is at 86-90 seconds, multiply 86 by the frames per second and you will get a good guess at where about your timeframe will start.
Part B) Copy all your images that you want into a new, clean folder.
Setting up GIF Movie Gear: Click on Edit -> Preferences -> Use tab -> Select "Other. Custom settings for palette and color settings." -> Click on Palettes tab, select "Map new to current global palette (no change)". -> Click Animation tab -> Set delay as "4". -> Click Export II tab -> Make sure everything on this page is ticked apart from the Filmstrips.
Step 5:
Boot up GIF Movie Gear.
Instructions: Click on Resize. Make sure you maintain aspect ratio. A good rule of thumb for youtube videos is that it can still look good at 40% of the size of a 720p. This also really cuts down on the file size
Step 6:
We're basically done now. You may want to click the start button, and see how it looks. If it is too slow or too fast, click the Clock with a downwards arrow on it, and edit the global frame delay. Once you've found your perfect frame delay, click on File -> Save As -> save it as type PNG, and input your file name. Since files with animation can be very large, I suggest you use Photobucket since it has greater file uploading limits than most sites. It also helps you keep track of all the pictures you've uploaded.
Step 7:
Copy the link and share!!!
<3